 Gift Sets
 Fragrances
 Whip Lush
 BYOB Sale
 Eye Like Options
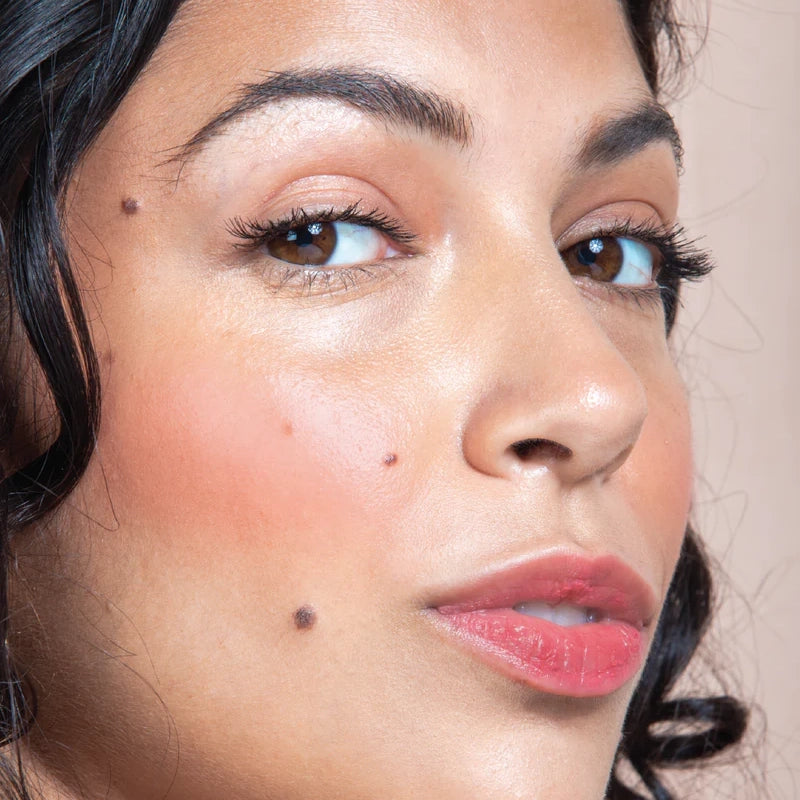 Glow Getter
 Play Paint
 Dart Its
 Stacked In Your Favour
 Bundles
Eye Makeup Tips That Instantly Elevate Your Look
Your eyes are the first thing people notice. A little attention in this area changes an entire look. Even the smallest change, like lining your waterline or adding a shimmer shade to the centre of your lid, makes a visible difference in how awake and put-together you look.
You do not need a lot of products or a lot of skill. You need to know what to do and where to do it. This guide covers the most effective eye makeup tips, from the simplest waterline trick to building a full blended eye look, with product recommendations from Gush Beauty at every step.
Tip 1: Line the Waterline to Make Eyes Look Bigger
Easiest Impact
This is the single most effective eye makeup trick for anyone who wants more definition without effort. The waterline is the inner rim of your lower eyelid. Applying kajal here makes eyes look wider, brighter, and more awake instantly.
For the biggest impact, apply a nude or white kajal on the lower waterline. It reflects light and creates the illusion of a wider, more open eye. If you want depth and drama instead, use a dark kajal and smudge it slightly below the waterline for a smoky effect.
The Eye Like Options 2-in-1 Eyeliner and Kajal is designed for exactly this dual purpose. One end is a precise liner for the upper lash line. The other is a soft kajal built for the waterline and smudging. It is one of the most versatile eye products in the Eyes collection and the first thing to reach for if you want simple, effective eye definition.
What does lining the waterline do?
Lining the waterline adds definition and makes the eyes appear larger or more intensely defined depending on the shade you use. A dark kajal on the waterline makes eyes look smaller but more dramatic and sultry. A light or nude shade on the waterline creates the opposite effect: it cancels out redness and makes the whites of the eyes look brighter, giving the appearance of bigger, more awake eyes. Both effects are useful in different situations.
Tip 2: Use Eyeshadow to Add Depth in Three Zones
Building Dimension
Many beginners apply eyeshadow as a flat wash across the lid. This works but it does not create dimension. The most flattering eye looks use three zones: the lid, the crease, and the inner corner.
The lid is the main surface. The crease is the fold above the lid where it meets the brow bone. The inner corner is the small triangular area near your nose. Each zone gets a different shade or intensity and the combination creates depth and shape.
Here is a simple three-zone formula that works on almost every eye shape. Apply the lightest shade across the entire lid as a base. Press a medium or darker shade into the outer corner and blend it into the crease. Add the lightest or most shimmery shade to the inner corner and the centre of the lid. Blend the edges so there are no harsh lines.
The Eye Like It Stacked 4-in-1 Eyeshadow Palette includes four coordinated shades specifically chosen to work together across these three zones. You do not have to think about which shades to combine. The palette does that for you. Use the lightest shade across the lid, the mid-shade in the crease, the shimmer on the centre of the lid and inner corner, and the deepest shade along the lash line. It is from the Eyes collection and works for both everyday and evening looks.
Blend with a clean finger or a fluffy brush. Work in small circular motions at the edges where two shades meet. This is where most beginners struggle. The goal is a transition, not a line. Take your time with this step and the rest of the look will fall into place.
How do I blend eyeshadow without it looking muddy?
The most common reason eyeshadow looks muddy is using too much product at once. Always tap off excess from your brush or finger before applying. Build colour in light layers and blend between each layer. Use a clean, dry brush or your clean finger to blend the edges where two shades meet. Never use the same applicator that has dark product on it to blend a lighter area. If shades mix incorrectly and look muddy, a clean finger pressed gently over the affected area can soften the result without adding more colour.
Tip 3: Apply Eyeliner as Close to the Lash Line as Possible
Clean Definition
A lot of beginners apply eyeliner slightly above the lashes rather than right at the base of them. This creates a gap that can make the liner look floating and unnatural. The closer your liner is to the lash line, the more it looks like a natural extension of your lashes rather than a drawn line.
For the cleanest line, tilt your chin slightly up and look down into a mirror. This angle gives you a clearer view of the lash line and makes it much easier to stay close to where the lashes grow.
The Eye Like Options Eyeliner and Kajal has a felt-tip precision liner on one end that makes staying close to the lash line easier. The narrow tip gives control without requiring steady hands. Start from the inner corner and work toward the outer edge in small, connected strokes rather than one long dragging motion. This gives a more even line, especially when you are still building confidence with liner application.
How do I stop my eyeliner from smudging throughout the day?
Smudging usually happens because the skin around the eyes gets oily as the day goes on, or because the liner was not fully set before the eye area creased or blinked. A few things help: let the liner dry for a few seconds before opening your eyes fully after application. Avoid applying liner to the moving parts of the upper lid if smudging is a persistent issue. Setting powder lightly over closed eyes after liner application can also reduce transfer. And choosing a liner formula that is specifically designed for long wear makes a significant difference.
Tip 4: Use the Shimmer Shade to Make Eyes Pop
Instant Lift
A shimmer or highlighter shade applied to one specific spot can transform an entire eye look. The most effective placement is the inner corner of the eyes and the centre of the upper lid.
The inner corner is the triangular area closest to your nose. Adding shimmer here catches light and creates the illusion of wider-set, more awake eyes. The centre of the lid, when you add a lighter or more reflective shade there, makes the eyes look rounder and more open.
You do not need a separate highlighter product for this. The lightest or most shimmery shade in a coordinated palette does the job perfectly.
The shimmer shade in the Eye Like It Stacked 4-in-1 Eyeshadow Palette is specifically included for this placement. Press it onto the inner corners and the centre of the lid using your fingertip for the most intense payoff. Using your finger instead of a brush picks up more shimmer and gives a more reflective, dimensional result. The Eyes collection has this as a standalone palette that you can build into any look.
For the inner corner shimmer trick, use the very tip of your clean ring finger. The ring finger applies the lightest pressure, which is ideal for the delicate eye area and for precise shimmer placement without overdoing it.
Tip 5: Define Your Brows Without Overdoing It
Frame the Eyes
Well-shaped brows change the look of the entire face. They frame the eyes and create structure. You do not need to dramatically reshape your brows. Simply brushing them upward and adding a light definition where they are sparse makes a visible difference without looking overdone.
The key mistake to avoid is drawing a solid line that does not match your natural brow. Natural brows have variation in density and direction. Filled brows should mimic that variation rather than creating a flat, uniform stripe.
Brush your brows upward with a clean spoolie before any product. This alone often gives definition and lift without needing to fill much at all. If you do fill, use short, hair-like strokes in the direction your brows grow rather than filling edge to edge in one motion.
How do I make my eyes look bigger with makeup?
There are four reliable techniques. Line the lower waterline with a nude or white kajal to open up the eye. Apply a shimmer or light shade to the inner corners of both eyes. Use a darker eyeshadow in the outer corners and crease to add depth that makes the eye area appear to recede slightly, which in contrast makes the lighter centre of the lid look more prominent. And finally, curl your lashes before mascara if you use it. Lash curl lifts the eye area significantly and makes the whole eye look more open even with minimal other products.
Tip 6: Layer Products for a More Polished Result
Build on What You Have
The most polished eye looks are built in layers. Each product you add should enhance and support what is underneath it, not compete with it. A good layering order for eye makeup is: eyeshadow first as your colour base, then liner along the lash line, then kajal in the waterline, then lash product if you use one.
Doing it in this order means any liner mistakes can be blended into the eyeshadow at the lash line instead of sitting on bare skin where they are harder to correct.
A practical layering approach with Gush Beauty products: start with one or two shades from the Eye Like It Stacked Eyeshadow Palette across the lid. Then line the upper lash line with the liner end of the Eye Like Options 2-in-1 Eyeliner and Kajal. Finish by using the kajal end on your waterline. This three-step approach takes under five minutes and gives a complete, polished eye look.
What eye makeup should I use for hooded eyes?
Hooded eyes have a fold of skin that covers part of the lid when the eyes are open. The key for hooded eyes is to apply eyeshadow slightly higher than where the actual crease sits because when eyes are open, the hood covers the true crease. Apply darker shades above the natural crease line rather than in it. Keep shimmer shades small and central on the lid. A liner on the upper lash line that flicks slightly upward at the outer corner gives a lifting effect. Avoid applying dark liner all the way around the eye as this can make hooded eyes appear smaller.
Tip 7: Care for the Under-Eye Area Before Eye Makeup
Prep Matters
Eye makeup sits and lasts better when the under-eye area is properly prepped. Dark circles or puffiness underneath the eye affects how the entire eye area looks once makeup is applied. Reducing puffiness before you start gives you a smoother, more even canvas to work with.
The Tired AF Reusable Under Eye Patches are a simple step to add before starting your eye makeup. Apply them while doing your skincare in the morning, then remove before starting eye makeup. They reduce puffiness and hydrate the under-eye skin, which means concealer or any base product in that area blends more smoothly and creases less throughout the day. From the Skin Care collection.
Why does my eye makeup crease throughout the day?
Creasing in the eye area happens for three main reasons. The skin around the eyes is very thin and moves constantly with blinking and expression, which causes product to shift. Oiliness on the eyelid causes eyeshadow to slip. And applying too much product in the crease area means it has nowhere to go but fold when the eye opens and closes. Applying a thin layer of eyeshadow rather than packing on product, and letting each layer dry before adding the next, reduces creasing significantly. Keeping a light touch in the inner crease area also helps.
Eye Looks for Every Occasion
For Work or College
Line just the upper lash line with the Eye Like Options Precision Liner. Add kajal to the waterline on the same product's kajal end. That is all you need. Under two minutes, clean and polished.
For a Day Out or Casual Occasion
Add one neutral shade from the Eye Like It Stacked Palette across the lid. Press the shimmer shade into the inner corners. Line the upper lash line. Done in four minutes.
For a Party or Evening
Use two shades from the Eye Like It Stacked 4-in-1 Eyeshadow Palette: a base shade across the lid and a deeper shade in the outer corner and crease. Press shimmer into the inner corner and centre of lid. Line the upper lash line with a thicker stroke. Apply deep kajal to the waterline. Smudge slightly for a smokier effect. This entire look takes under eight minutes.
Final Thoughts
Eye makeup does not have to be complicated. The biggest results come from a few well-placed products used consistently. Lining your waterline, placing shimmer where it catches light, and blending eyeshadow properly are the three skills that unlock the most variety in eye looks.
Start with the Eye Like Options 2-in-1 Eyeliner and Kajal for daily definition. Add the Eye Like It Stacked 4-in-1 Eyeshadow Palette when you are ready to explore colour. Both are available in the Eyes collection at Gush Beauty.
Disclaimer: Makeup results vary with skin type and application technique. Always remove eye makeup gently at night to protect the delicate eye area.
Written by Chirag Jain

Cream vs Powder Products: Which Should Beginners Choose?
Jul 28, 2026

Build the Perfect 5-Minute Beauty Routine with Gush...
Jul 24, 2026

Social Media Beauty Trends vs Timeless Makeup: What...
Jul 20, 2026

10 Makeup Application Tips That Instantly Make Your...
Jul 18, 2026

Cruelty-Free Beauty Explained: What Every Conscious Shopper Should...
Jul 14, 2026

Bold Nail Designs for Short Nails That Make...
Jul 10, 2026

10 Makeup Application Tips That Instantly Make Your...
Jul 06, 2026

How to Choose the Right Sunscreen for Your...
Jul 03, 2026

Makeup FAQs: Beginner Questions Answered
Jun 29, 2026

How to Build a Simple Daily Beauty Routine...
Jun 24, 2026

